 The past week has been exhausting with the house move, K on a week-long break from school and of course endless list of errands that piles up from a combination of these two. As we finally have our wi-fi up and running and Keya is back at school, here I am dutifully posting the recipe I promised for these amaaaazing biscuits.
Packed with healthy ingredients, mildly sweet, these biscuits keep so well even in this god awful humid weather! Best paired with a glass of warm or chilled milk for the little ones for a quick after-school snack or a perfect to add to lunch-boxes. (Seriously, you will never want to dunk an oreo in a glass of milk again!)
Being equally popular with the kiddos and grown-ups (they’re so good paired with a piping hot cup of chai!) I usually end up doubling the recipe each time I make these 🙂
Nutrition note: Ragi (finger millet) is a rich source of calcium, protein and iron. It is also a good source of fiber.
Almonds are rich in fiber, Vitamin E, Protein, and Minerals (manganese, potassium, calcium, iron, magnesium, zinc, and selenium), and have considerable amounts of essential fatty acids. They are also rich in beta carotene, which is a powerful antioxidant that helps boost immunity.
Ingredients:
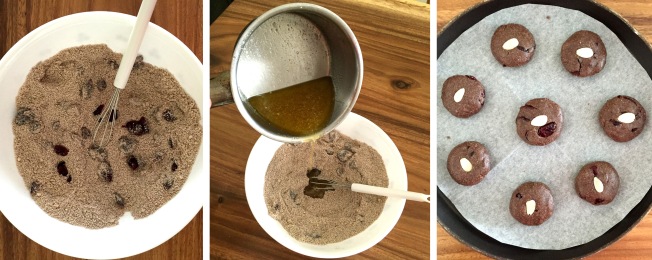
Dry mix :
- 3/4c. Ragi (finger millet) flour
- 1/2c. ground almonds
- 1/2 tsp baking soda
- 1/4c. dried cranberries (or mini-chocolate chips or chopped candied ginger)
- a pinch of salt
Wet mix:
- 1/2c. unsalted butter (soft)
- 3-4 tbsp runny honey
- 2 tbsp. brown sugar
To decorate:
- 1/4 cup of almond flakes
To make:
- Measure and mix all the dry ingredients into a large mixing bowl. Break up any clumps of dried cranberries (they tend to stick) to ensure an even distribution throughout the dough.
- Melt the butter in a saucepan over gentle heat. Add the honey and brown sugar and whisk gently until the sugar is completely dissolved and the mixture looks silky smooth.
- Pour the melted butter-honey-sugar mix into the bowl of dry ingredients. Work quickly and stir everything together till it form a soft but crumbly dough (this happens as ragi / finger millet is gluten-free).
- Cover and chill the dough in the refrigerator for about 20 min. This makes it a bit easier to handle.
- Pre-heat your oven to 180 deg C. Line your baking tray with baking paper.While the oven heats up, scoop small balls of dough using a teaspoon onto your palms and roll them till smooth, tucking away any cheeky pieces of cranberries that try to escape.
- Place the rolled dough balls onto the baking sheet and flatten using gentle pressure from your finger tips. Dot each biscuit with a pretty almond flake.
- Bake at 180 deg C for about 15-17 min. Allow the biscuits to cool for a few minutes before transferring carefully onto a wire rack. The biscuits are a bit fragile at this point (but firm up as they cool completely), so be gentle!
These keep well stored in an air-tight container for about 8-10 days – IF they last that long 🙂