Category Archives: 11 mos +

Avocado Pesto with Alphabet Macaroni

Standard

000

Avocado Pesto.. its one of those things that once you have tried it, you might not want to make traditional pesto again =D

This recipe has been a hit with my little girl for as long as I can remember and the only thing that has changed in the last 4 years, is the size/ shape of the pasta that has evolved with her changing preferences.

The recipe is simple, easy and best of all, you can whip up a large batch when you find great avocados and basil and simply freeze it into portions to use later. I have frozen this pesto for up to a month and although the top layer does darken just a wee bit, it was just as creamy and delicious as the day I first made it. It really is a great way to incorporate avocados into your baby/ child’s diet.

The recipe in the featured photographs is dairy-free & nut-free. I occasionally add toasted pecans or pine nuts and some grated parmesan cheese if I have those handy.

00Nutrition note: Avocado is a hi-fiber superfood rich in Vitamin B &K, Potassium, Folate and Copper. It is a great source of mono unsaturated (good) fats and is great for good hair and skin health.


Ingredients:

  • 2 cups fresh Italian basil leaves
  • 2 medium avocados
  • 1 or 2 cloves garlic, peeled
  • 6-7 tbsp extra virgin olive oil
  • Sea salt & cracked black pepper, as per taste
  • 1/2 lemon


Optional additions: 1/4c. of toasted chopped pecans OR 1/4c. of toasted pine-nuts + 1/4c. grated Parmesan cheese. You will need a little more olive oil to thin out the pesto if you add the nuts and cheese.


To make:

  1. Wash the basil leaves gently and pat dry with a paper towel. Slice the avocado in half and remove and discard the seed.
  2. Transfer the basil leaves into the jar of your food processor. Scoop out the avocado flesh into the food processor and add the peeled garlic
  3. Lock the lid in place and ‘pulse’ 4 or 5 times till the basil is chopped up into small pieces. Scrape down the sides of the food processor.
  4. Add the olive oil, sea salt and cracked pepper and a nice squeeze of lemon juice and puree the mix till the pesto is creamy and smooth.

Stir a generous dollop of this pesto through your child’s favourite type of pasta and top with grated Parmesan cheese! So good!!

Tip:  Dress up this simple dish using cherry tomatoes,sauteed mushrooms or steamed corn kernels … Or …diced grilled chicken … Or …K’s favourite…bite sized chunks of poached salmon to make this into one delicious, healthy, power-packed meal for the kids and grown ups alike!

0

Pumpkin-Coconut & Ginger Soup

Standard

So, we’re already in 2015. Wow. I began writing this blog in July 2013 when my daughter Keya was about 9-1/2 months old. As she grew, so did the nature of the recipes I posted. Having recently realized that my blog has comparatively fewer recipes for parents who have younger children I will now consciously try to post more recipes that the 1 year old and younger can enjoy!

photo 2 (3)
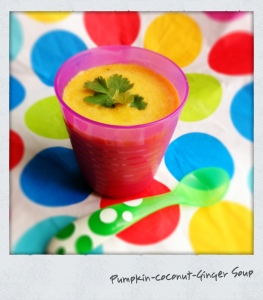
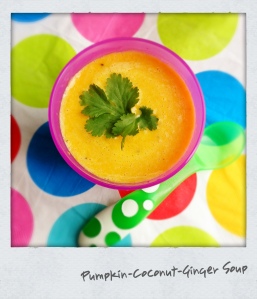
This vegan and gluten-free recipe for pumpkin-coconut & ginger soup is a very slightly simplified version of the one I read on a health and wellness website ( http://www.sanaqi.com/pumpkin-coconut-ginger-soup/). The original recipe is perfect, but I simply omitted a few of the ingredients – mainly, coconut oil, as i did not have any. I reduced the proportion of the chick peas that the original recipe calls for as they make the soup rather thick and although healthy, can make little ones a bit gassy. The original recipe calls for roasted pumpkin puree. But I have also tested this out using steamed pureed pumpkin and trust me, it is just as delicious. So don’t stress if you don’t own an oven or simply just don’t want to bother with the roasting. Also, I used lukewarm boiled water to thin out the soup to Keya’s liking ( instead of vegetable broth) as it was one less thing to do 😀

Pumpkin puree is a great choice for a first food for babies and can be introduced around 6-8 mos. Coconut is non-allergenic and very easily digested and in general ok to introduce to babies over 7 mons (based on my research). Chickpeas are safe to introduce to babies who are older than 8months. The ginger in this soup is mainly for its flavour. Go easy on it if you think your little one is too young for it or will not like the taste. It is great for the immune system but not recommended for very young babies. So overall the recipe rating is for 9 months and up. Leave out the ginger and you can feed this to your (older than) 8 month old if she/he is handling pureed mixed veggies nicely and is ready for some fun flavours 🙂

Nutrition report: Pumpkin makes this soup a powerhouse of beta carotene, potassium, protein, and iron . Chickpeas are a great source of fiber and protein. Coconuts are highly nutritious and rich in fibre, vitamins C, E, B1, B3, B5 and B6 and minerals.

Ingredients:

– 1 cup mashed roasted or steamed pumpkin (pumpkin puree)

– 1+1 tbsp olive oil

– 1 clove garlic, sliced

– 1 med. onion, sliced

– 3/4inch knob peeled ginger, sliced into thin rounds

– 3/4cup thick / OR /1-1/2 cups thin coconut milk

– 1/2 to 3/4cup pressure-cooked chickpeas (or low sodium canned ones)

– boiled & slighly cooled water, as needed

– salt & pepper, as needed

Do-ahead for pumpkin: If roasting the pumpkin, preheat oven to 180 deg C. Peel and cut half of a small pumpkin into 1″ cubes. Tumble the cubes on to a baking tray lined with aluminum foil. Drizzle a little olive oil and season with a little salt and pepper. Toss well using hands. Bake for abt 25-30mins or till the pumpkin is soft and lightly golden. Cool slightly and mash well using a fork. Should make about 1 cup of mash/ puree. Set aside.

 – OR –

Alternatively – steam or boil the peeled pumpkin cubes in water. Drain, cool and mash well. Reserve the cooking liquid to use for thinning out the soup later.

Do-ahead for chickpeas: Soak 1/2cup of dried chickpeas in warm water for atleast 4-5 hours or overnight. Pressure cook the soaked chickpeas in 2 to 3 cups of fresh water for 6-7 whistles or till soft. Drain and set aside to cool. If using canned chickpeas, select the low sodium variety. Drain the chickpeas into a colander. Rinse well under running water to get rid of all the brine (liquid in which they’re preserved). Set aside for later use.

photo 1 (3)Method for soup:

1. Heat the olive oil in a saucepan or slightly deep frying pan. Add the sliced garlic, onion and ginger and saute till soft. Lower the heat.

2. Pour the coconut milk in followed by the chickpeas. Do not boil, but just let the mixture warm through nicely and then turn off the heat. Allow the pan to cool down a bit.

3. Place half the onion-coconut milk-chick peas mixture in a high speed blender with half of the pumpkin mash. Add a little boiled water (or the cooking liquid from the pumpkin). Puree till nice and smooth. Add the remaining ingredients in batches to get a nice velvety smooth soup.

4. Pour the pureed soup back into your saucepan. Heat through once while occasionally stirring. Adjust the consistency to your liking with some water and season with salt and pepper. (Can avoid the salt altogether for babies under 1)

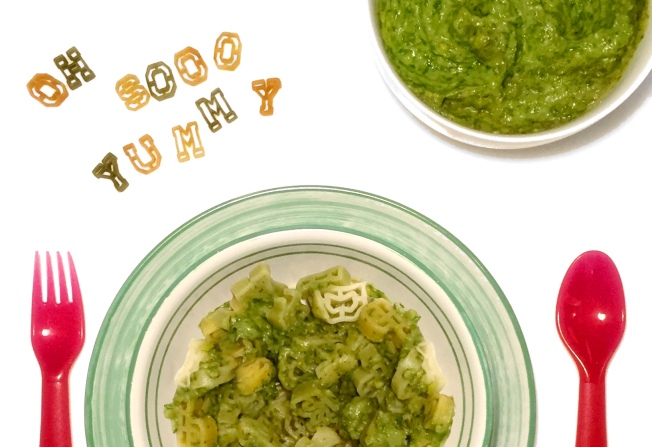
Feel free to add a little cooked white or brown rice or some cooked couscous if your older baby will appreciate the texture.

This is undoubtedly a recipe the whole family can enjoy. You can also freeze portions of this soup for later when you are pressed for time. Although I try to avoid it, I do need to freeze soups/ pasta sauces for Keya every now and then. My personal level of comfort is to try and use up the frozen portions within 2-3 weeks. If you do freeze the soup, thaw and re-heat it till super hot, preferably on the stove top and then allow it to cool down to the right temperature before feeding your child.
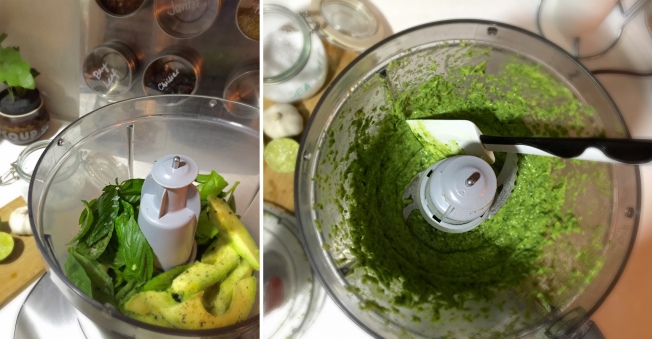
Quinoa Cutlets

Standard

photo 2I admit it… I’ve been a wee bit obsessed with Quinoa in the past couple of weeks. I’ve always loved recipes featuring this super seed but Keya’s not quite ready to try those yet as most are salads.  As she has finally started to react positively to her Quinoa “khichdi”  (an indian preparation involving cooking lentils and rice with vegetables and mild spices like tumeric and garlic) I made it my mission to create more recipes with simple handy ingredients.

Marie, my helper, miscalculated the quantity and accidentally cooked an enormous batch of Quinoa for a salad I wanted to make a few weeks ago.  This recipe was a result of wanting to use up leftover plain- cooked quinoa, but has turned out to be such a big hit with Keya, that its becoming a regular item on our weekly meal plan 🙂

Nutrition report:  Quinoa is packed with fiber, calcium, iron and folate and is a fantastic source of vegetarian protein.  Shredded veggies pack in loads of flavor and vitamins.


photo 1 (1)Ingredients:

– 1 cup cooked Quinoa

– 1 small onion, very finely chopped

– 1/4 cup finely grated carrot + finely grated broccoli

– 1 small handful, coriander, finely chopped

– 1 clove garlic, grated

– Salt & Pepper, to taste

– 3-4 tbsp dried breadcrumbs (optional)


Method: 

1. In a large mixing bowl, place cooked, drained quinoa along with remaining ingredients. Mix well while mashing everything together using lightly oiled hands.

2. Heat a tablespoon of olive or vegetable oil in a non-stick pan. Scoop a small handful of the mixture into your hands and shape into a ball and flatten into a cutlet.

3. Gently place the cutlets into the pan and cook till golden brown. Flip and cook on the second side.

4. Place the cooked cutlets on a paper towel/ napkin to remove any extra oil. Cool the cutlets and cut up into age appropriate bite sized portions and serve with or without some ketchup on the side 🙂


These cutlets are rather delicate and very soft. The crust formed on the outside is easily chewable even for a toddler with fewer teeth.  Happy eating!

Quinoa Pancakes with Orange zest

Standard

photo 1As a working mum Monday to Friday is about following a schedule for Keya like clockwork. It’s the only way to not let the endless list of chores, errands and to-do-list for work related commitments overwhelm me. But  this also means a standard breakfast menu for Keya through the week. Eggs & orange juice, Fruit with yoghurt and Oats are the items Keya’s nanny is comfortable putting together for her through the week while I am away at the office. Weekends are the only real time where I can indulge Keya in one of her favourite breakfasts – Pancakes, that I usually make using home-made Oat flour. I was keen to experiment with Quinoa but finely ground Quinoa is a bit tricky to achieve using a food processor*.  So when I found organic Quinoa flour at Mustafa centre, I resolved to experiment with this wonderful ingredient.

I mixed Quinoa flour with the remaining standard pancake ingredients – eggs, milk, vanilla and baking powder to make a smooth batter. The batter tasted rather nutty and for a minute I was unsure if K would like it. So I added a teaspoon of brown sugar (use white if that is what you have at hand) and some orange zest, from the peels of the Orange I had juiced for her to drink with breakfast. The flavour combination was fantastic, and sure enough a big hit with my little foodie 🙂

*Indian dry grinders or  spice grinders will yeild better results for grinding hard seeds like Quinoa at home… and yes, Quinoa is infact a seed, not a grain… Something I myself learnt recently too!

Nutrition report:  Quinoa is packed with fiber, calcium, iron and folate and is a fantastic source of vegetarian protein. Eggs in the pancake are a great source of protein, calcium and iron.


photo 4Dry Ingredients:

– 1 cup Quinoa flour

– 1 tsp each : baking powder, ground cinnamon and brown/ white sugar

– 1 tsp fresh orange zest (from 1 orange)

Wet ingredients:

– 1 egg, whisked

– 1/2 to 3/4 cup milk

– 1 tsp vanilla extract  +  1 large tbsp Olive oil

Toppings:

– Butter and Honey or Maple Syrup


To make:

1. In a large mixing bowl, whisk all the dry ingredients together. Set aside.

2. In a separate bowl, whisk together all the wet ingredients.

3. Gently pour the wet mix into the dry and stir to make a smooth batter. If you find the batter a bit sticky add a little splash of milk to get it smooth.

4. Heat a non-stick pan on medium-low heat. Pour a small amount of batter on the pan. The batter spreads itself a little bit and then sets into a round. Wait for little holes to form on the top side and then flip the pancake to cook on 2nd side.

5. Stack up the cooked pancakes on a plate. Top with a knob of butter and drizzle on honey or maple syrup.  Serve along side some freshly squeezed Orange juice and then sit back and happily watch it all disappear into a greedy little baby’s belly 😀


photo 3


Avocado & Cheese Omelette

Standard

12 (1)I owe the regular readers of this blog and friends who text/ call me for baby food ideas- the biggest apology. I’ve been telling a number of you about new recipes that I plan to post “this coming weekend” and dint make true of my promise.  Put simply – I went through a phase where the recipe ideas flowed but I had a case of serious writer’s block. But this afternoon, I’ve made a promise to myself — block or no block, recipes I shall post.

Avocado’s are considered as among nature’s most perfect food. It is also on the list of ideal first foods that a lot of nutritionists recommend for babies as they’re high in good fats that help in the healthy development of your baby’s brain and central nervous system.  They’re loaded with vitamins, contain important minerals such as potassium, calcium.

I introduced Keya to avocado’s in mashed form mixed with banana’s or steamed peaches at around 6 months of age. She loved the creamy texture but as she began to teeth, lost interest in it as she preferred food she could gum instead.

Let’s admit – although Avocado’s are packed with great stuff, its hard to tempt a curious toddler with its mild flavoured mash – at least that’s the challenge I have faced in the past few months. I started baking using avocado recently but have been trying to use it in something which was more routine – and then it hit me! The answer had been right before my eyes!

Mashed avocado in scrambled eggs or cheese omelette is AMAZING!  I’ve made 2 versions of this recipe – one, adding the mashed cado’s into the whisked eggs before cooking – for a proper avocado omelette. Another, of topping a cheesy omelette with fresh avocado slices. Both are equally delicious with only real difference being that the incorporated cado omelette has a slight greenish tinge.

Feel free to stir mashed avocado or pre-made thawed avocado puree into scrambled eggs just as they begin to set… I’ve tried that too, but haven’t taken a photo of that yet.  If you’re baby is under the age of 1 and you prefer to avoid the egg whites, just scrambled egg yolks and avocado will work just as well. Add a dollop of cream cheese (if available) and you’re good to go.  For toddlers and older kids I’d even recommend adding a few spoonfuls of avocado puree into your pancake batter…yum!

Nutrition report:  Great source of protein, calcium, multi-vitamins, potassium and iron.

BTW – Something is messed up with the wordpress text formatting … I am aware that some text appears larger than the rest and I have no idea why.. Please bear with me till I have it figured out and fixed.  Thanks!

Ingredients:

– 1 large Egg  (or only egg yolk for babies under 1)

– 1/2 a mashed avocado (Mash remaining avocado with a squirt of lime juice and freeze. For 1 egg yolk use abt 2 tsp of avocado puree)

– 2 tsp of grated cheddar cheese / OR / 1-2 tbsp of cream cheese

– Pinch of cracked black pepper. Salt is optional (as we’re using cheese)

12 (2)Method: (For Avocado Omelette)

1.   Heat a non-stick pan. Drizzle a wee bit of oil and swirl it around a little. 

2.  While the pan heats, whisk the egg with a fork till light and fluffy.  Stir in the mashed avocado and the cheese. Season with pepper.

3.  Pour the egg-avocado-cheese mixture in the middle of the pan and allow it to spread out into an omelette. Cook on a medium heat till the        top has set, flip and cook for a minute on the second side. DONE! 

Method: (For Scrambled eggs with avocado)

1.   Heat a non-stick pan on medium heat. Drizzle a dab of unsalted butter and swirl it around a little.

2.  While the pan heats, whisk the egg with a fork till light and fluffy. Add the cheese and mix well.

3.  Pour the egg mix into the centre of the melted butter (borrowing Ina Garten’s trick for fluffy scrambled eggs). Lower the heat and gently stir the eggs as they start to set.

4.  Add the mashed/ pureed avocado into the pan jusssst as the egg mix starts to set. Stir gently to evenly distribute the avocado into the eggs. Turn off the heat once cooked. Season with black pepper and DONE! 🙂

Beetroot Cutlets

Standard

IMG_4573Coming up with interesting and fun ways to incorporate vegetables into children’s food is a stumbling block every young parent I know has encountered. Every family has a list of vegetables that is on their regular grocery list – cauliflower, beans, broccoli, carrots, okra, cabbage, eggplants and leafy greens are on ours. Then there are the occasional buys – like mushroom, pumpkins and bell peppers. I have a third list that consists of vegetables that I LOVE but know only so many ways to cook – like bitter gourds and beets. Growing up the only way I remember eating beets was boiled. More recently I started to enjoy Beetroot+ Apple juice when I have the chance. But boiled and juiced beets are not usually on a kids favorite foods list. Its more often than not the vegetable most kids show little to no enthusiasm for. Yet  beets are of exceptional nutritional value; and I was therefore keen to weave them into Keya’s diet. These cutlets are a complete hit with little Keya as well as her beet-hating (now beet-loving) dad! 🙂

Nutrition report: Rich in iron,vitamin C, folic acid ,manganese, potassium & fiber.

photoIngredients:  (makes 6-8 cutlets)

– 1 med. raw beetroot, peeled & finely grated

– 1/2 cup raw oats, coarsely powdered

– 1/4 cup crumbled paneer (optional)

– 2 cloves garlic, peeled & grated

– 1 small onion, very finely chopped

– 1 egg, beaten (optional)

– 1/4 cup dried bread crumbs

– 1-1/2 tbsp dried basil or mint

– salt & pepper, to taste

To make:

1.  Place grated raw beets, oats, paneer, onion, and garlic in a mixing bowl. Add the dried basil or mint leaves and season with salt and pepper.

2. Crack one egg in a seperate bowl. Whisk lightly. Pour the whisked egg into the beet mixture followed by the breadcrumbs. (For vegetarian kids, leave out the egg and add only breadcrumbs. I’ve tried this recipe with and without the egg. Both are just as good.) For recipe with egg, you might need a little more breadcrumbs to help soak up the excess moisture.

3. Once the mixture is well combined, divide it into lemon sized balls. Roll around between your palms to make the ball and pat down gently to flatten into a cutlet.

This recipe freezes very well. I prefer to make up a batch of 6-8 cutlets and freeze these to be used over the next few of weeks. Once you make all the cutlets, you can place them on a non-stick paper and freezer till hard, then transfer the frozen cutlets into a ziplock freezer bag to store in the freezer. Please thaw frozen cutlets to room temperature before cooking. 

4. Heat a little olive or vegetable oil in a non-stick pan. Lightly fry the cutlets on both sides till a nice crusts forms on the outside. Place cooked cutlets on a paper napkin till they’re cool enough to feed your child. Cut up into age-appropriate sizes before offering to your child.

These are outstandingly delicious when sandwiched with toasted bread or burger buns and some tomato ketchup 🙂 Great for meal times, snacks and also lunch boxes for older kids (and parents!)

I came up with this recipe when Keya was about 13 months old. But am positive this recipe can be used for babies as young as 11 mos – specially those who have 6-8 teeth and enjoy chewing on their food.